> ## Documentation Index
> Fetch the complete documentation index at: https://aibco.mintlify.site/llms.txt
> Use this file to discover all available pages before exploring further.
# Configure Your Widget in General Settings
> Set widget mode, business name, photo, authorized domain, hosted page, launcher style, and enable your AIBCO widget. Copy your embed snippet here too.
The General settings page ([aibco.ai/dashboard/general](https://aibco.ai/dashboard/general)) is where you choose your widget mode, set your business identity and photo, authorize your domain, publish your hosted page, style the launcher, enable the widget, and grab your embed snippet.
## Widget mode
Choose how visitors interact with the widget on your site. You can change this at any time without editing your website code.
 | Mode | What visitors see |
| ----------------- | --------------------------------------------------------------------------------------- |
| **Render Only** | A visualizer: pick a product, place it on your property, generate renders. Chat is off. |
| **Render + Chat** | A conversation first. The AI answers questions and can launch the visualizer inline. |
Not sure? Start with **Render Only** to get live quickly. Switch to **Render + Chat** once your knowledge base is ready.
### Readiness requirements
The widget will not go live until these requirements are met. Your dashboard shows a single alert guiding you to the first unmet item.
| Mode | Minimum requirements |
| ----------------- | ------------------------------------------------------------------------------------------------------------------------------------------------------ |
| **Render Only** | Somewhere to run (authorized domain OR published hosted page) plus at least 1 product that is both **Live** (has an image) and **Visible** (toggle on) |
| **Render + Chat** | All of the above plus at least **100 characters** of knowledge saved (across Text, Website, and Document combined) |
Both modes work identically on both surfaces: the embedded widget and the hosted page.
A Live product with its **Visible** toggle switched off does not count. The widget cannot serve a product it is not allowed to show. A token amount of chat knowledge is not enough either; the assistant needs at least 100 characters to work with.
## Business name
In the **Business name** section, click **Edit** (or type directly if it is your first time), enter your company name (e.g. *Acme Kitchens*), and click **Save**.
Your business name appears in the chat, in render result emails, and wherever the widget refers to itself. The name is editable on every plan, including Free. Free plan visitors see "YourName -- powered by aibco.ai" (the suffix is added at display time only). Paid plans show the name alone. Upgrading removes the suffix immediately with nothing to re-save. The maximum length is 100 characters.
Separately from the name, visitors see a small "Powered by aibco.ai" line under the widget or hosted page on every plan.
## Business photo
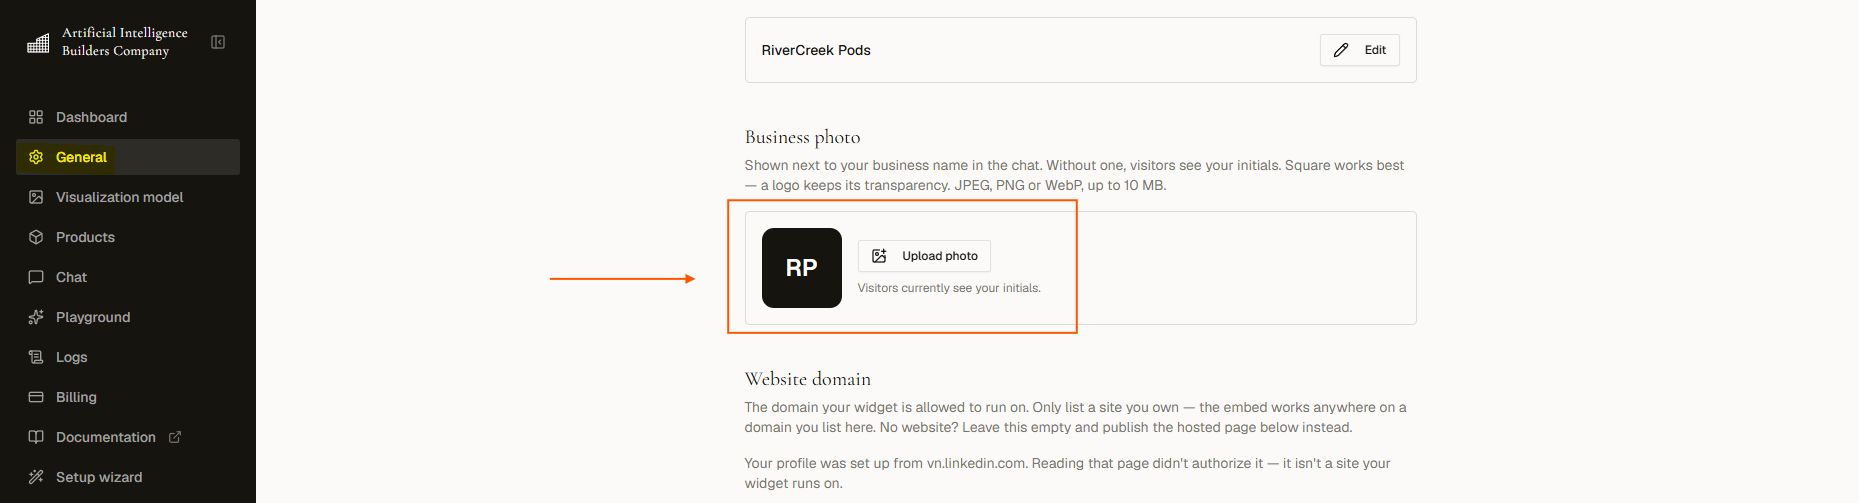
Your business photo appears next to your business name in the chat, in the embedded widget, and on the hosted page when running Render + Chat. Without one, visitors see your initials on a dark tile.
In the **Business photo** section, click **Upload photo** and choose a JPEG, PNG, or WebP file up to 10 MB. A square image works best.
| Mode | What visitors see |
| ----------------- | --------------------------------------------------------------------------------------- |
| **Render Only** | A visualizer: pick a product, place it on your property, generate renders. Chat is off. |
| **Render + Chat** | A conversation first. The AI answers questions and can launch the visualizer inline. |
Not sure? Start with **Render Only** to get live quickly. Switch to **Render + Chat** once your knowledge base is ready.
### Readiness requirements
The widget will not go live until these requirements are met. Your dashboard shows a single alert guiding you to the first unmet item.
| Mode | Minimum requirements |
| ----------------- | ------------------------------------------------------------------------------------------------------------------------------------------------------ |
| **Render Only** | Somewhere to run (authorized domain OR published hosted page) plus at least 1 product that is both **Live** (has an image) and **Visible** (toggle on) |
| **Render + Chat** | All of the above plus at least **100 characters** of knowledge saved (across Text, Website, and Document combined) |
Both modes work identically on both surfaces: the embedded widget and the hosted page.
A Live product with its **Visible** toggle switched off does not count. The widget cannot serve a product it is not allowed to show. A token amount of chat knowledge is not enough either; the assistant needs at least 100 characters to work with.
## Business name
In the **Business name** section, click **Edit** (or type directly if it is your first time), enter your company name (e.g. *Acme Kitchens*), and click **Save**.
Your business name appears in the chat, in render result emails, and wherever the widget refers to itself. The name is editable on every plan, including Free. Free plan visitors see "YourName -- powered by aibco.ai" (the suffix is added at display time only). Paid plans show the name alone. Upgrading removes the suffix immediately with nothing to re-save. The maximum length is 100 characters.
Separately from the name, visitors see a small "Powered by aibco.ai" line under the widget or hosted page on every plan.
## Business photo
Your business photo appears next to your business name in the chat, in the embedded widget, and on the hosted page when running Render + Chat. Without one, visitors see your initials on a dark tile.
In the **Business photo** section, click **Upload photo** and choose a JPEG, PNG, or WebP file up to 10 MB. A square image works best.
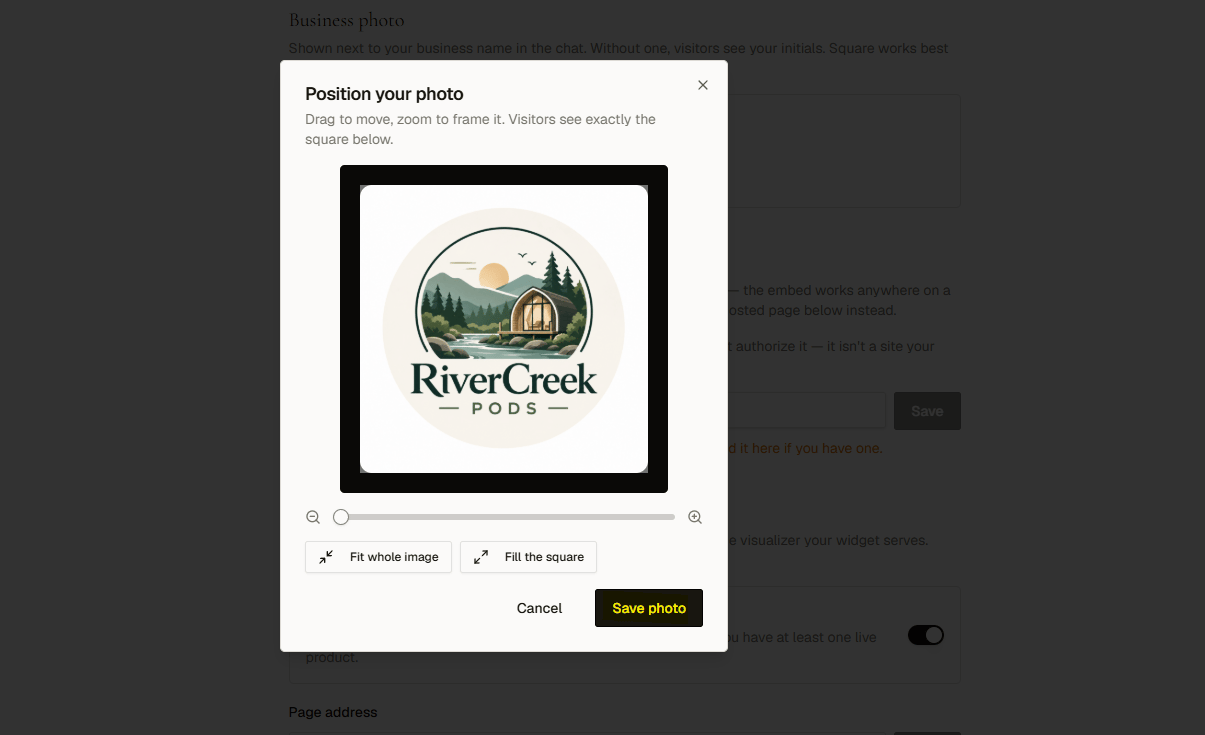
 In the dialog, drag to reposition, zoom in or out, and choose **Fit whole image** or **Fill the square**. Click **Save photo** when it looks right.
 Click **Remove** to go back to initials. Upload a new file at any time to replace the current photo.
Business photo is a paid-plan feature. On Free the section shows "Available on paid plans" and visitors see initials. Downgrading keeps the file but hides it; upgrading again restores it with no re-upload.
## Authorize your website domain
The widget only loads on domains you explicitly approve. It silently stays hidden on any other site.
Find the **Website domain** section on the General page. [**aibco.ai/dashboard/general**](https://aibco.ai/dashboard)
Type your domain (e.g. `mywebsite.com` or `https://mywebsite.com`).
Click **Remove** to go back to initials. Upload a new file at any time to replace the current photo.
Business photo is a paid-plan feature. On Free the section shows "Available on paid plans" and visitors see initials. Downgrading keeps the file but hides it; upgrading again restores it with no re-upload.
## Authorize your website domain
The widget only loads on domains you explicitly approve. It silently stays hidden on any other site.
Find the **Website domain** section on the General page. [**aibco.ai/dashboard/general**](https://aibco.ai/dashboard)
Type your domain (e.g. `mywebsite.com` or `https://mywebsite.com`).
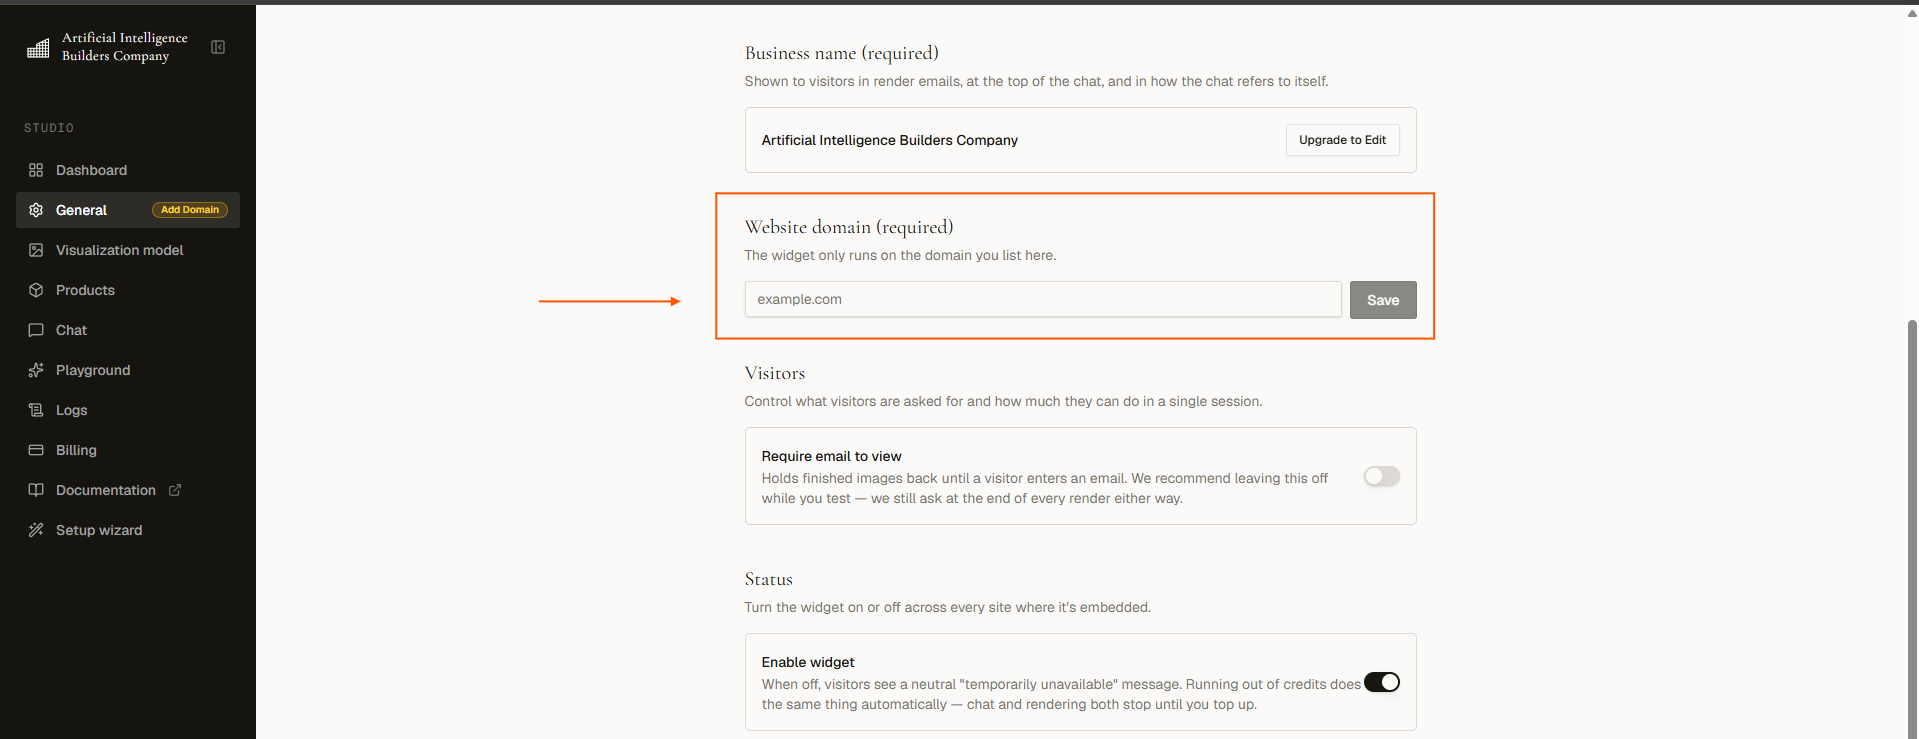 Click **Save**.
No website? Leave this empty and publish your [hosted page](/hosted-page/overview) instead. The domain only governs the embed. If your profile was set up from a page you don't own (a social or marketplace listing), this section says so; reading that page did not authorize it.
Only **one domain per account**, on every plan. To move the widget to a different site, remove the saved domain and save the new one.
## Hosted page
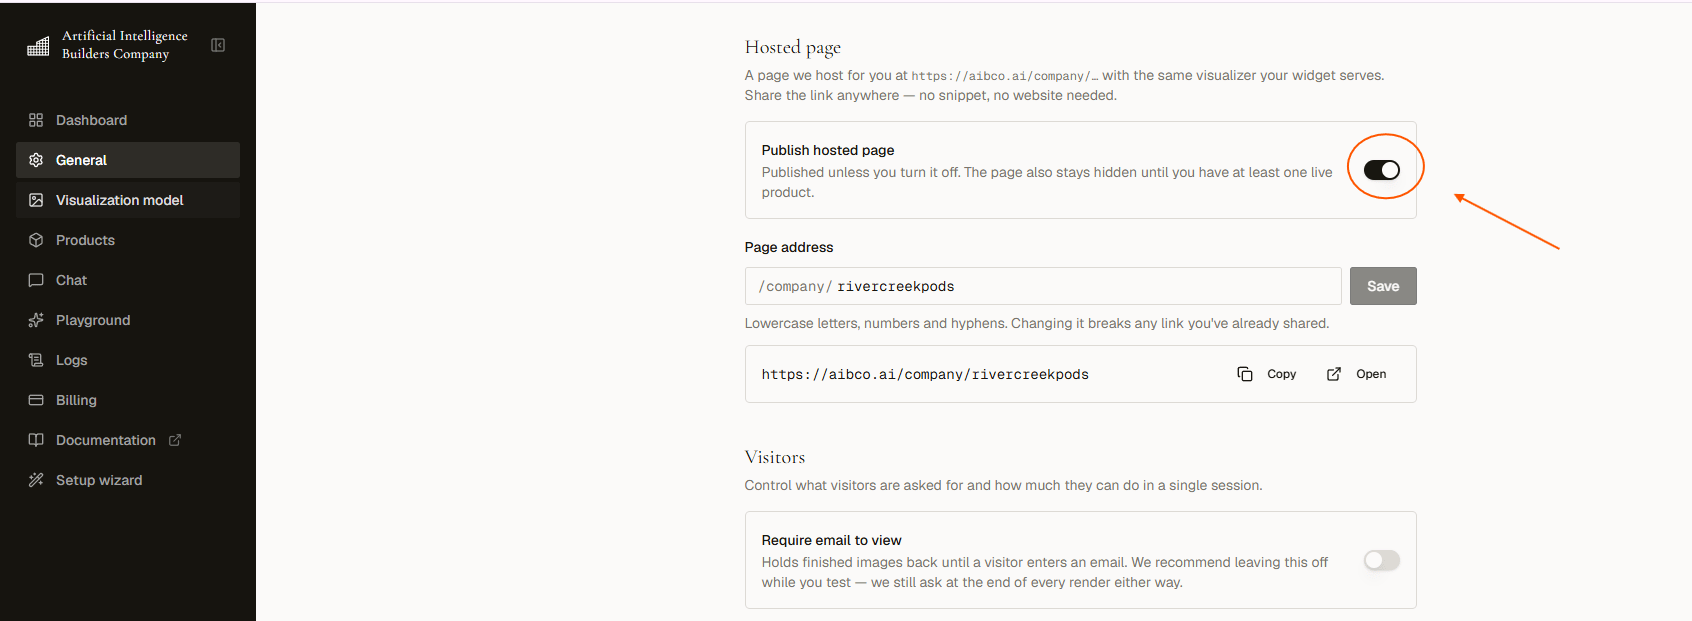
AIBCO can host a public page for you at `aibco.ai/company/your-name` with no domain or embed snippet required. It works as an alternative or complement to embedding the widget on your own site.
In the **Hosted page** section, enter the path you want (e.g. `your-name`). This becomes `aibco.ai/company/your-name`.
Click **Save**.
No website? Leave this empty and publish your [hosted page](/hosted-page/overview) instead. The domain only governs the embed. If your profile was set up from a page you don't own (a social or marketplace listing), this section says so; reading that page did not authorize it.
Only **one domain per account**, on every plan. To move the widget to a different site, remove the saved domain and save the new one.
## Hosted page
AIBCO can host a public page for you at `aibco.ai/company/your-name` with no domain or embed snippet required. It works as an alternative or complement to embedding the widget on your own site.
In the **Hosted page** section, enter the path you want (e.g. `your-name`). This becomes `aibco.ai/company/your-name`.
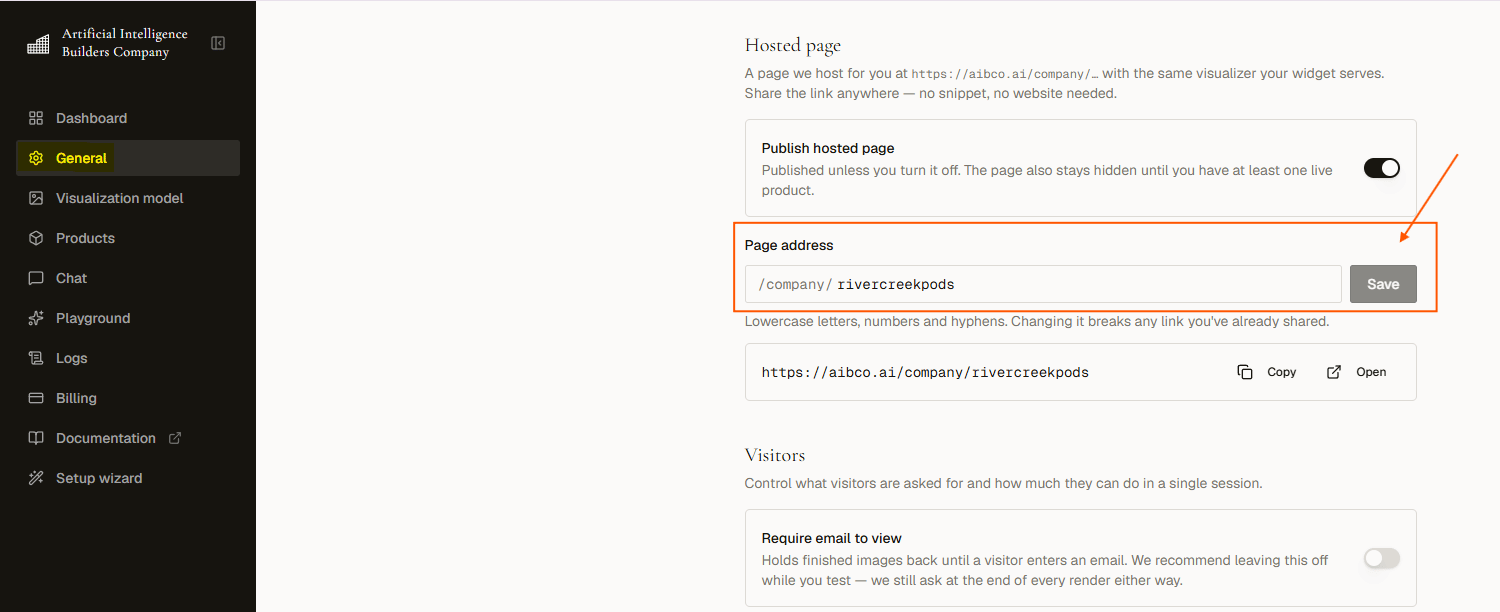 Turn on **Publish** to make the page live.
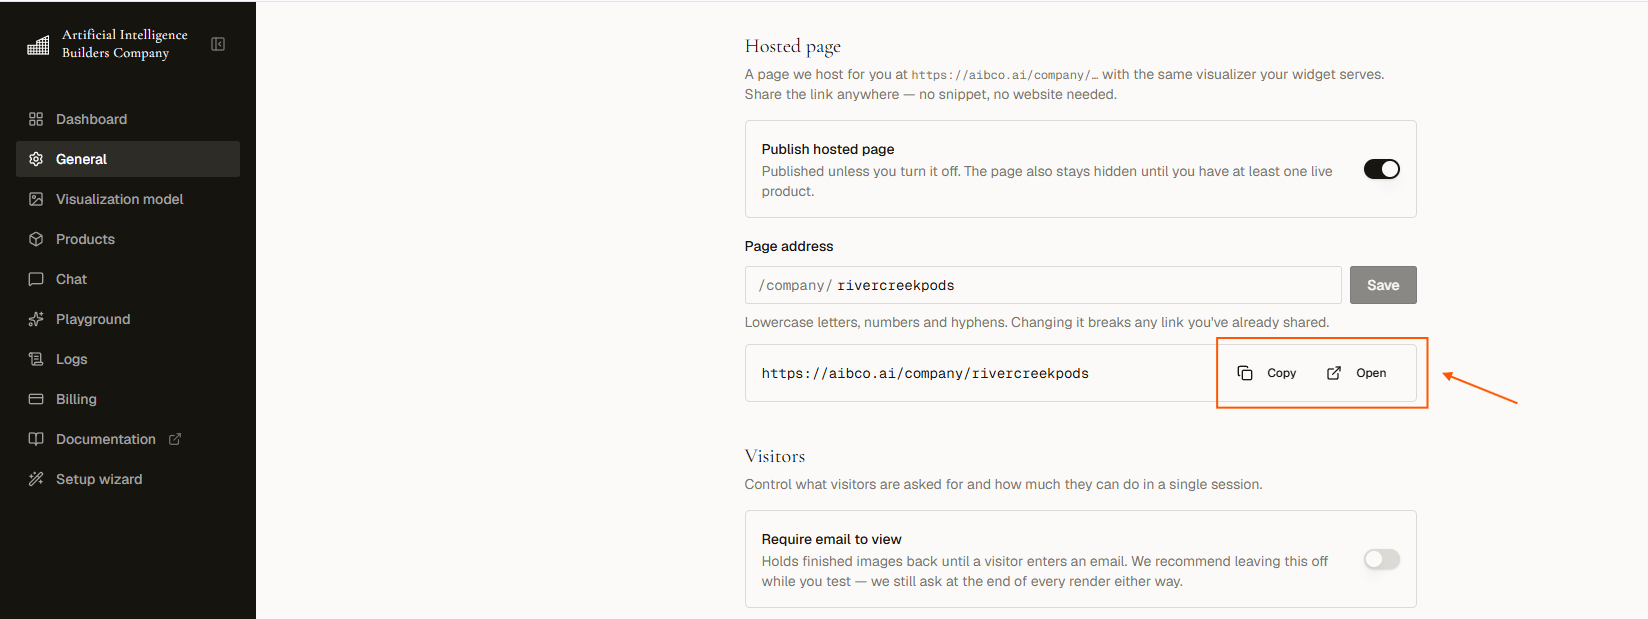
 Click **Copy link** or **Open** to view the page.
 See the full guide at [Hosted page](/hosted-page/overview) for details on setup, branding, and sharing.
## Launcher style
You can customize the launcher text and appearance so the button matches your site. See [Launcher style](/widget/launcher-style) for the full guide.
## Enable widget
The **Enable widget** toggle in the Status section turns the launcher on or off across every site where it is embedded. Leave it **on** once you are ready for visitors.
See the full guide at [Hosted page](/hosted-page/overview) for details on setup, branding, and sharing.
## Launcher style
You can customize the launcher text and appearance so the button matches your site. See [Launcher style](/widget/launcher-style) for the full guide.
## Enable widget
The **Enable widget** toggle in the Status section turns the launcher on or off across every site where it is embedded. Leave it **on** once you are ready for visitors.
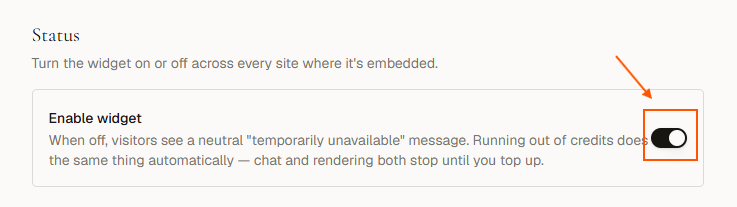 You do not need to remove the embed snippet to hide the widget. Just disable it here and re-enable it when you are ready.
## Next steps
Choose how your products are visualized in the widget.
Customize the launcher text and appearance.
Set up a standalone page hosted by AIBCO.
Add the widget snippet to your own website.
You do not need to remove the embed snippet to hide the widget. Just disable it here and re-enable it when you are ready.
## Next steps
Choose how your products are visualized in the widget.
Customize the launcher text and appearance.
Set up a standalone page hosted by AIBCO.
Add the widget snippet to your own website.